Instructions
See Where to buy" page on this website for availability.
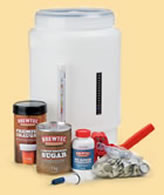
Step 1 – Fermenter Assembly
The fermenter (carboy) holds up to 23 litres of beer.
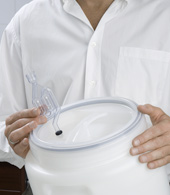
Airlock & Grommet
Fit the small rubber grommet (which creates an airtight seal) to the fermenter lid and insert the airlock into the lid.
Thermometer
Remove backing strip from the digital thermometer and affix half way up the outside of the fermenter.
Tap & Sediment Reducer
Screw the tap into the fermenter. Inside the fermenter, fit the sediment reducer to the back of the tap with the opening facing upwards. (This will avoid sucking sediment into your bottles, delivering a clearer beer.)
Other Useful items (Not included in the kit)
Long wooden spoon, can opener, small amount of boiled and cooled water for the bubble trap.
Step 2 – Brewing Preparation
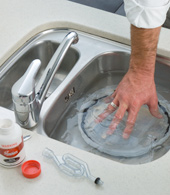
Cleaning and sterilising is vital. Clean fermenter and equipment with household detergent before sterilising. We recommend Brewtec ‘No Rinse’ steriliser for the fermenter and all components coming in contact with the brew, e.g. stirring spoon, bubble trap.
Mix your Brewtec ‘No Rinse’ steriliser in your fermenter at the recommended dilution. (Use a total of 5 litres.)
Soak equipment (including the inside of the lid) in the solution for at least 30 minutes.
Swirl the solution around to ensure the whole inside is sterilised and let a little through the fermenter tap.
Step 3 - Brewing Instructions
Brewtec brewing mixes contain the malted extract and hops (already processed) ready for brewing. All you have to do is add water and some extra brewing sugar (supplied). Place your fermenter in the position you want it to ferment. Once full they are difficult to transport.
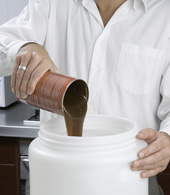
Take Brewtec 1.5kg brewing mix; remove the label and plastic cap. Put aside the yeast enclosed under the cap.
Stand can in hot water for 10 minutes to soften contents.
Dissolve contents and 1kg of brewing sugar in 2 litres of hot water in the fermenter. Add 17 litres of cold water and mix thoroughly. Use a small amount of boiling water to rinse out the remaining extract in the can.
Add 2.5litres of hot or cold water to give a final temperature of approximately 18-28°c, to avoid damaging the yeast. Sprinkle the yeast sachet over the liquid and affix lid and airlock. Half fill the airlock with water.
Airlock bubbling is a good indication that fermentation has started (6-12 hours after adding yeast). Keep brew at between 18-28°c until specific gravity is 1006 (approximately 4-7 days). At this time the airlock will have stopped bubbling.
Step 4 – Fermentation Monitoring
Monitor your brew using the thermometer and hydrometer. Do not remove the fermenter lid during fermentation. Watch the thermometer on the side of the fermenter and ensure the temperature remains between 18 and 28°C. If your brew drops under 18°C, fermentation may slow or even stop. In winter a heater pad or heater belt will keep the temperature above 18°C.
The hydrometer measures the density (specific gravity) of liquids. In brewing this means the amount of sugars (malt and dextrose) in the brew. The original gravity of the brew will be approx. 1035-1040. As fermentation proceeds sugars are converted into alcohol and carbon dioxide (CO2) bubbles through the airlock.
When fermentation is complete a standard can of concentrate and 1kg of dextrose brewing sugar will usually finish at a specific gravity of 1006. If a liquid brewing sugar or malt extract is used, then reading is usually 1012.
To take a reading, use the tap on the fermenter and fill the test jar approximately 3 / 4 full - until the hydrometer floats. Give the hydrometer a quick spin to remove gas bubbles which will interfere with the reading. Where the beer cuts across the hydrometer, is where you get the reading on the scale of the hydrometer. Do not put the beer back in the fermenter.
When the hydrometer reading is constant for 24 hours, the brew is ready for bottling.
Step 5 – Bottling and Conditioning
Cleaning and sterilising is vital. Clean fermenter and equipment with household detergent before sterilising. We recommend Brewtec Steriliser for the fermenter and all components coming in contact with the brew, e.g. stirring spoon, bubble trap.
Mix your Brewtec Steriliser in your fermenter at the recommended dilution. (Use a total of 5 litres.) Soak equipment (including the inside of the lid) in the solution for at least 30 minutes. Swirl the solution around to ensure the whole inside is sterilised and let a little through the fermenter tap.
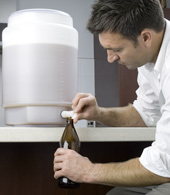
Once fermentation is complete bottle and bottle condition the beer. Sterilise 30 x 750 ml bottles, crown seals and bottling equipment. To do this, wash with household detergent and a bottle brush, rinse. Then, mix Brewtec Steriliser (at the correct dilution rate) in warm water, and soak the bottles for at least 10 minutes. Swirl the solution around so that the whole inside surface has been covered.
After soaking, drain. Add one teaspoon (slightly heaped) of normal sugar to the bottom of each bottle. If using stubbies, halve the amount of sugar. Remove the airlock before opening the tap to prevent water from the airlock going into your brew. Fit the brews bottling valve to the tap. Fill each bottle to within 40mm of the top by lifting the bottle up so the valve presses on the base of the bottle and opens, allowing the beer to flow.
Cap each bottle using crown seals and capper. Gently tip each bottle 4 times to dissolve sugar. Date and label bottles. Store bottles upright in a warm place (approx 18-25°C) for five days to allow for secondary fermentation (bottle conditioning), which charges the beer with CO2 bubbles. After 5 days, move bottles to a cooler place (approx 8-12°C) and leave for a further week for flavours to mature. Bottle conditioning beer continues to improve with age. We recommend you try your brew at 3 weeks, 3 months and 6 months.